Search Wikipedia

Search results

Dec 17, 2013

Working with Camera in Android

Taking a Picture in Android


Create a new project in Eclipse from File ⇒ New ⇒ Android ⇒ Application Project and fill all the required information. I left my main activity as MainActivity.java

Working with camera needs set of permissions and features in the AndroidManifest.xml file. Add following in your AndroidManifest.xml

android.hardware.camera – Required to use camera hardware
Adding required permissions in manifest file

Dec 10, 2013

Custom Dialog in Android

Creating a Custom Dialog in Android

I create a new android application project called "Custon_dialog"
Then I need to create a custom layout for my custom dialog and for this I create a new xml file called "dialog.xml"
In my custom dialog i want to show a picture and  some texts.
So, i drag a picture in my drawable folder.

dialog.xml


<?xml version="1.0" encoding="utf-8"?>
<LinearLayout xmlns:android="http://schemas.android.com/apk/res/android"
    android:layout_width="match_parent"
    android:layout_height="match_parent"
    android:orientation="vertical" >

    <ImageView
        android:id="@+id/imageView1"
        android:layout_width="110dp"
        android:layout_height="160dp"
        android:contentDescription="@string/todo"
        android:padding="20dp"
        android:src="@drawable/android" />

    <TextView
        android:id="@+id/textView1"
        android:layout_width="170dp"
        android:layout_height="211dp"
        android:text="@string/i_love_android" 
        android:textSize="25sp"/>

</LinearLayout>

Android Custom ListView With Images And Text

Customizing of ListView 

Today I am gonna customize the listview with images and text.
For this I create a new project called "Listv"
Then I drag a listview in "activity_main" xml file.


This xml file code looks like this:

<RelativeLayout xmlns:android="http://schemas.android.com/apk/res/android"
    xmlns:tools="http://schemas.android.com/tools"
    android:layout_width="match_parent"
    android:layout_height="match_parent"
    tools:context=".MainActivity" >

    <ListView
        android:id="@+id/listView1"
        android:layout_width="match_parent"
        android:layout_height="wrap_content"
        android:layout_alignParentLeft="true"
        android:layout_alignParentTop="true" >
    </ListView>
</RelativeLayout>

Dec 5, 2013

Customization of Gridview

Customizing the Gridview 


After completion of simple gridview, now I am going to customize that gridview like opening the full-sized images from gridview and naming the images of the gridview.

For this, i create a new android project called "Grid_cus"
As we have done before, drag the gridview layout in graphical layout as shown below:

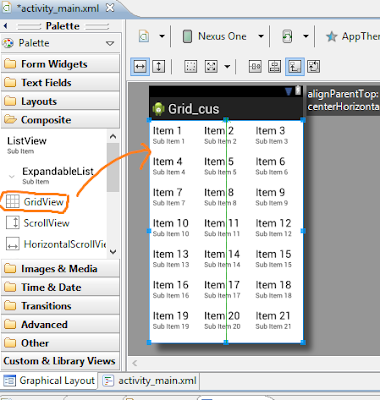
Draging Gridview in the layout


As like before tutorial, place the pictures in res->drawable-hdpi folder.
Then  i create a new class called "ImageControl.java" and write these codes :

public class ImageControl extends BaseAdapter{
Context mcontext;

public  static int[] ImageIds= { R.drawable.a, R.drawable.a1,R.drawable.a2, R.drawable.a3,
R.drawable.f, R.drawable.e,R.drawable.a7, R.drawable.a6,R.drawable.a5, R.drawable.a4,R.drawable.r, R.drawable.a1,R.drawable.v};

String texts[] = new String[]{"good","best","bad","damn","lool","joker","hard",
"kool","magic","aaare","pop","rock"};

public ImageControl(Context context){
mcontext = context;
}

Dec 3, 2013

Basic GridView Layout in Android

Creating a Basic GridView Layout in android

 GridView is a viewGroup that displays items in a two-dimensional,scrollable grid. The grid items are automatically inserted to the layout using a ListAdapter.

Today i am gonna create a simple Gridview layout.Now  I prepare images which i want to show in grid layout and place them in res->drawable-hdpi folder.

Images in Drawable-hdpi which will be shown in Gridview

I go to activity_main.xml and drag gridview layout from Palette or I can also write code directly for gridview which will be like this:

activity_main.xml

Oct 18, 2013

Content menu in Android

  Creating a Content Menu


Android has a unique mechanism called long press.
 When we click any button or image for long time a kind of menu appears that is called content menu.

Today i am doing a project related to this.
First of all i create a project called "Content_menu".
Then go to XML file.
>>>>>>>>>>>>>>>>>>>>>>>>>>>>>>>>>>>>>>>>>>>>>>>>>>>>>>>

activity_main.xml


<RelativeLayout xmlns:android="http://schemas.android.com/apk/res/android"
    xmlns:tools="http://schemas.android.com/tools"
    android:layout_width="match_parent"
    android:layout_height="match_parent"
    tools:context=".MainActivity" >

    <Button
        android:id="@+id/button1"
        android:layout_width="wrap_content"
        android:layout_height="wrap_content"
        android:layout_alignParentLeft="true"
        android:layout_alignParentTop="true"
        android:layout_marginLeft="106dp"
        android:layout_marginTop="159dp"
        android:text="@string/button" />
</RelativeLayout>
>>>>>>>>>>>>>>>>>>>>>>>>>>>>>>>>>>>>>>>>>>>>>>>>>>>>>>>>>

Adding a button in xml

Then i create a new xml file called contentmenu.xml
Note: Choose menu in Resource Type

Creating a new XML file

Option Menu in Android

Creating an option menu


There are different kinds of menu in android.
Today i am gonna  create a option menu.
There are couple of ways of creating option menu.
One  is directly by java code and another is using XML.

But in my case i will use XML because it provides good graphical interface and its easy to handle in compare to java. So i create a new XML file.

Creating a mymenu.xml


mymenu.xml


<?xml version="1.0" encoding="utf-8"?>

<menu xmlns:android="http://schemas.android.com/apk/res/android" >
    
    <item android:id="@+id/item1" 
        android:title="Option 1" 
        android:icon="@android:drawable/ic_menu_compass"/>
   
    <item android:id="@+id/item2 "
        android:title="Option 2" 
        android:icon="@android:drawable/ic_menu_call"/>
</menu>


mymenu.xml


Oct 17, 2013

Drawing animation in Android

Drawing graphics directly using XML

We can also draw graphics in android using XML .
First i need to create a blank project called "Drawing"
Then make a new  file inside the drawable folder called rect.xml.

Creating a new xml file 
I write this codes inside my rect.xml:

<shape xmlns:android="http://schemas.android.com/apk/res/android"
    android:shape="rectangle">
    <gradient
        android:startColor="#FFFF0000"
        android:endColor="#80FF00FF"
        android:angle="45"/>
    <padding
        android:left="7dp"
        android:right="7dp"
        android:top="7dp"
        android:bottom="7dp"/>
    <corners android:radius="10dp"/>
    </shape>

Animation.xml


Tween animation in Android

Using Tween animation


After frambyframe animation lets focus on tween animation, it is much simpler to program essentially we give start and end values to android and it gonna interpolate the values between them itself.
First of all i make a blank project called Tween.
Change the layout to relative but mine is relative layout by default.
Now i drag a button in the layout.

Dragging button in my layout


Oct 16, 2013

FramebyFrame Animation in Android

Using framebyframe technique for animation in android


Today i will use frame by frame way of animation . Here i have a sequence of images which  will be use as frames and continuous rapid  change in these  frames cause the illusion which looks like an animation.

OK lets then start.
I create a new project called "Anime".
I got a collection of images which contains 33 images. You can also make such images using Photoshop or any other photo-editor applications.

My image collection which will be use for Frame animation

 Now i come to my resource directory in eclispe i.e. res folder.And i drag all my images in drawable folder.

Dragging images in drawable folder

Now i go to my XML file and change my layout from Linear Layout to Relative Layout.
 Here i need a imageview so i drag a imageview in my layout.
Dragging imageview in my layout


Alternate layout and Resources

 Creating an Alternate Layout and Resources


Android provides an alternate layouts and resources based upon the devices used.
If we develop any apps in portrait form then it may not look good in landscape mood.
Here i am gonna develop an alternate layout for landscape mood.
Then lets start.
 I create a new project named "Alternate"
Then i go to XML file and drag a button, a textview, togglebutton and a imageview.

Here is portrait view
Layout in Protrait View
When i switch this layout to landscape it looks like this and it is not good.

Layout view in Landscape mode


Using Explicit intent

Sending data from one Activity to another Activity


Today i am using explicit intents to send data from one activity to another . For this i create a new project called Explicit. Then i create new XML file in layout called Second.xml.
As i am sending data from one to another activity . I need to create a new activity for this i go to src and right click it and create new java file(activity)

Creating new java class for new activity

After creating, open second.java and a blank class appears . I need to extend that class by Activity.After extending, i need to right click in between two curly braces then go to Source and then click Override/Implement Methods.


Oct 15, 2013

Using only XML file for Listview control

List Controls by using only XML 

Most of the app provides the facility of browsing items in list.So, it is definitely a important control tool for items.
Today i am learning something about controlling list and customizing the lists.
I create a new project named "List_controls".
Now i make a new XML file in values folder  which is inside res folder and name it "array.xml".
Creating new XML file


You can see the lines of code written in array.xml file
which is shown in below image.

array.xml
I need to put listview in my layout by dragging listview from composite list .

Inserting listview in my layout


Oct 13, 2013

Using resources and setting background

Setting some resources in my projects


Today i am gonna learn  to add resources in my project and use such resources.
First of all i make a new android project named Backapp.


One of the way of adding resources is by going to eclipse Worskspace folder and inside my project there is res folder where i can add my resources.Here i will add a background image in drawable-hdpi folder.I can add image in 4 different resolutions but in this project i am  being  lazy so i am just using one resolution.

Adding resources in my project
Or we can directly add resources like image in my project by dragging or copying the image in drawable folder in eclipse.

Here i have a background image in drawable folder but it has not been updated in eclipse. In this condition, i have to clean my project. For this goto main panel there is Project->Clean

Cleaning the project to make update

And a new window appears and click clean and the problem is solved.


Here i am using 400*600 resolution image.

In addition of image i also want to add  a sound in my project. For this i will make a raw folder in res folder.
Right clicking the res folder. 
New->Folder
 A new window will appears and i name my folder name "raw" and click finish.
Sound can be added in this folder following same step like in adding image in drawable folder.

Adding more resources like sound in my project

Now to put background in my layout, go to activity_xml and 
 write this short code:

android:background="@drawable/background"


Putting background in layout

Now i run this project in my AVD and it appears like this.

Running my project in AVD

Oct 12, 2013

XML layouts and units of measure in android

Knowing about XML layouts and Units of measure


We should know about XML layouts and Units of measure which is particularly important while developing apps for multiple screen sizes. So, I am practicing some XML features . U may also find this useful.

I goto Main layout file and click activity_main.xml under layout. A graphical editor is opened. Here default layout is Linear Layout. Click activity_main.xml to go to main xml source.
There is android orientation in Linear layout and by default it is vertical which means I can add items in vertical fashion.

Opening Activity_main.xml
I drag a button out in graphical editor. There is a lint error in button because the word ' button' is not saved in string resource. So I have to add 'button' word in string res. In easy way I can fix it by  clicking red color button at right side as shown in figure and clicking this a new window will pop up and click fix . Save project by Crtl+s , then that error is fixed.


Fixing the lint error
Here layout width and height is fill_parent which means this layout gonna fill the whole screen.
And in button by default it is wrap_content. It means this button only gonna take as much space that it requires to take up.

Knowing about fill_parent and wrap_content

Oct 11, 2013

Creating my first Android Project

Being familiar to Eclipse environment for Android development

Today i am gonna  understand the full overview of eclipse environment for developing an android application.

OK. Then lets start.

First of all i create a new android project .
Go to File->New->Android Application Project
Then a new window will appears.
Creating a new android app

 
Application Name:  Name of application(eg: Myfirstapp, Camcap)
Project Name: Name of my project(eg: Myfirstapp)
Package Name: Name of my android package and it should be unique(eg: com.kais.myfirstapp)

Then i click to Next and new window will appears. I don't need to do anything in this window so click next again . Now another window appears. Here i can change my app icons.In my case i willn't change my app icon so it will be default as it is.

Changing app icon
Click next button then a new window will appears.In this window I need to create an activity. In android app, there could be many activities. As our requirement we can choose different kinds of activities. Here I need just a simple blank activity so by clicking next I create a blank activity.
Creating an required activity


 In new window, I need to give name of activity and layout.
In navigation type , there are different options. Navigation is the way how we interact with activity. It could be fixed tap ,scrollable and dropbox. In my case I just choose None.
Then I just click Finish button and now I am ready for my code.

Creating new blank activity with optional inner navigation


Now if u also try these all steps , u will get this window like mine.

Overview of eclipse for android development


There is Package Explorer  in left side as shown in below figure. Here I need to know about followings:

1: Source code -> Myfirstapp.java (It is the place where I write my java codes)
2: Generated code-> R.java (I needn't to care about this, its self generated code)
3.Resources-> In this we keep our user interface datas like images,sounds,strings value. And under the          option of layout there is main.xml where I write my UI xml code.
 4.Configuration-> AndroidManifest.xml (There are four building blocks to an Android application i.e                activity,intent,service and content provider and as our requirement we should list                them in our file)


Package Explorer
Most basic thing to know is that android consists of two languages one Java and another XML.

I go to res->layout->activity_main.xml


XML provides both direct coding and drag n drop option
In XML files i can define Strings, layout window, create GUI controls and assign even handlers. The java method will read the layout from XML file and pass it to setContentView(don't worry i will write about this in upcoming posts).

Opening java file from source file
Another important feature of android programming is manifest file. Everything which needs to be requested by an application must be include in manifest file.

Opening AndroidManifest.xml 
There requires a detail study about manifest file because it depends upon the types of applications like if i am creating an app which needs internet srvice then i must include internet  permission in manifest.

Oct 10, 2013

Day 0 : Setting up my computer for android programming

Today I set up my computer to develop android application.

First of all i search for different approaches of installing android developing tools . After sometime of googling I  find a easy way of installing  it in my computer.

You may either use Eclipse or android studio. In my case I prefer Eclipse.

Starting Eclipse for android programming

Google has provided a packaged and configured Eclipse IDE based android tools called ADT (Android Developer Tools)

I go to android developer official site  and  download the bundle. The downloaded bundle is portal and doesn't needed to install. You can just copy it and run in any computer.

Webpage to download ADT Bundle. Scroll Down to choose a right version.

 Click here to download the ADT Bundle.

Note: While downloading , we must choose the right OS version .

After downloading the ADT Bundle, i unzip the file   and open the eclipse.
Then i create my  own workspace. Workspace is the place where all your projects are saved .
By default there is only one SDK for one platform. In order to download other latest version of SDKs , i  open SDK manager in eclipse  and choose  the required API version  and download them.

Click on the Icon circled above, then the new window (pointed by arrow head) will open up.


Now I need to create an Android Virtual device(AVD). Even i have got my own android mobile but to make sure my Android SDK installation includes the Android Virtual Devices, I will test it by clicking on the "AVD" button - right next to the above encircled button for "Android SDK Manager". After I click the button, a new window opens up, where I created a new virtual device, which looked as follows.
Creating AVD
AVD Name: The name of the device (eg: MyPhone, Galaxy, etc)
Device: Predefined device (Choose one from the list)
Target: The targeted device which will run your app
Emulation Options:

[Snapshot] is like "Hibernate" feature in computer. If that is enabled, the AVD will start faster in next launches.

After setting up all the above options I clicked on "OK" and a new device was created. I clicked the device I just created, and then on "Start" - on the right, after which a new virtual device started, which looked like this. This is a virtual device to test my application.


This way, I have set up the following in my computer:
  1. Downloaded and installed the Android ADT Bundle from Android Developers' website.
  2. Opened up eclipse and set up a workspace to store all my project files.
  3. Opened SDK Manager and updated my installation to latest versions.
  4. Created a new virtual device to test my applications.
  5. Played with different options and menus to make myself familiar!

After setting up the ADT-Bundle on my computer , i am ready to start a new project from day 1. I am quite excited right now! 

Day 0: Diving Into Android

I myself have got a android smart phone (Samsung Galaxy S1). I am studying Software engineering   in Gandaki College of Engineering and Science, Pokhara. I was looking forward to start programming for mobile phones and i found android , the most popular one nowadays. My friend, a freelance Android developer from Kathmandu - Nj has been helping me in my projects.  Later , I will try to make an android developers group in Pokhara , interested one can contact me. As i have already posted in my post for 10 days i will make total research in android and after that i will start my 1 app a day Projects.


Purpose of this blog

I have created this blog to document the process along my journey of learning Android Programming.

I will be creating simple android apps - one app a day - regularly for 30 days, and post my experience as well as source code of the apps in github.

I believe, at the end of the 30 days I'll have gained enough experience to start my career as an android developer. Moreover I'll have 30 working apps to show as my portfolio, and join a team of developers to pursue my professional app development venture.

Sample Android Logo
I will start writing on this blog once I get ready to do android programming - which requires me to learn the background. For one or two weeks I'll be reading books and blogs to make myself familiar with the android, its history, its usage and market value. I'll start with development within two weeks.


I believe this blog will have at least 30 posts within the next 45 days, or I'll consider myself as a serious failure!
}